Monday, May 30, 2011

I Smell Summer

I would so much rather be kayaking than studying protein synthesis on this gorgeous Memorial Day holiday. But alas, human physiology awaits.

To make me forget about classwork, here are some of my favorite things this week:

breaded zucchini spears
I got this recipe from Dad and it's super simple! They're baked and healthy

We had them with one of my favorite meals: Stuffed Shells
I love to make this meal ahead of time and heat it on the day we're ready to eat.

We kegged the new brew! It's extra hoppy

Of course we had to have a sample, 
even though it won't be fully carbonated for a couple days

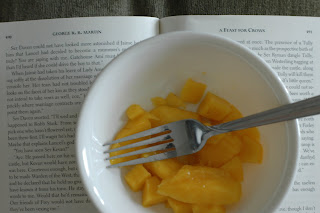
Yesterday I had mango for breakfast while reading. 
It was such a nice morning and it took me back to my days in Barbados

I made this summer salad for lunch to keep it light, since I made BBQ for dinner. 
MMM BBQ...


I'm itching for summer to begin for outdoor excursions and possible beach trips.
Oh, how I miss Barbados!

Monday, May 16, 2011

LA's Gran Bars

Ok so I lied. Somewhere between clicking "publish post" and grabbing a sweater for the patio, the sky darkened and rain came tumbling down. So instead I made these:

GRANOLA BARS!
So I thought I'd put up my recipe, since I frequently get asked for it.
Good luck!

Here's what you'll need:
2.5 cups Rolled Oats
1/2 cup raw pepitas (pumpkin seeds)
1/4 cup sunflower (or sesame or similar) seed
1/4 cup flax seed (not ground!)
1 cup raw almonds (or other nuts)
1/4 cup peanut butter (I use the fresh ground from Fresh Market/ WF)
1/4 cup natural honey
1/4 cup dark brown sugar
1 tsp sea salt
1 tsp cinnamon
1 tsp vanilla
1 cup dried fruit (chopped small)

Preheat your oven to 325 degrees.

First, Mix your oats, nuts, and seeds in a big bowl and spread on a lined baking sheet and set timer for 10 minutes.

While these are toasting, combine the ingredients for your glue (honey, pbutter, brown sugar, sea salt, cinnamon, vanilla) in a small pot. Once your timer goes off, reset it for 5 minutes and then turn the burner on very low. Be sure to mix the glue well or else it will start to burn. 

When the oats mixture is finished, pull it out and pour it back into your big bowl. Add your dried fruit and stir. Then take the glue and pour it over the oats, trying to get every last bit out of the pot. But don't take too long or it will start to stiffen!

Use a big spoon to mix and knead the oats into the glue. You want to make sure every bit is covered to help it all stick together. 


Once it's all mixed, pour it into your lined baking pan. I like to use an 8x8 to make fat, short wedges. I used to use a 9x13 to make thinner bars. Whatever your preference! Use parchment paper to line the pan and create a basket by laying one piece over the other (like a "t"). 

I like to use the liner from the baking sheet (used previously) to press down on the mixture and make it really compact within the pan. The tighter the better for sticking!


When you're all packed in, stick it back in the oven. This is where it gets tricky. Depending on the amount of chewy/crunchy you want and the size pan you use, your baking times will change. 
For an 8x8 I try to bake for about 10 minutes for chewy bars. It may take you a few times to test out what time works best for you. 

Pull it out of the oven and let it sit to cool for a few minutes before you pull it out of the pan or it will lose its shape. When you do pull it out, stick it on a cutting board and let it cool completely before cutting into your desired bars.

Ta da!
Wrap them tight and put them in a big ziplock!

Sunday, May 15, 2011

Weekend Recap

Friday we enjoyed a late dinner trip to Bob's Big Gas Subs & Pub where I had the Left Turn at Albeturkey. If you have not yet ate dinner, stop what you are doing and go get this. It was amazing. Turkey with pepper jack cheese, pico de gallo, lettuce, black bean spread, and guacamole! Again, something I wouldn't have ate two years ago. But I think I found my usual order at Bob's. I also had an Amber Ale from Carolina Brewery and a Vanilla Porter, which wasn't as creamy as I like my porter but the hint of vanilla was a treat. 


Saturday was pretty lazy although I did clean out my closet. Today, however, we managed to make it out to the Greek Festival!


We both had chicken souvlaki and the tzatziki sauce was SO GOOD. Luckily the rain held off while we were there, so we meandered about the place as neither of us had been before. The music was entertaining and the food delicious. A cute trio of women made us some Greek coffee, which was very strong and had a hint of cocoa which we obviously drank as we ate our baklava. How can you go to a Greek Festival and not have baklava? 

Now I will continue to bask on the patio with some wine until bugs or chill drive me inside. Our plants are flourishing and we even see some veggies starting to grow. I can't wait to start eating them!


Monday, May 9, 2011

Sous-brew

Before heading down the Pinehurst for the weekend for MW's birthday, we had a big task to complete:

Brewing our next beer!


This was our 6th brew, having already made: Walberry Wheat, Honey Nut Brown, Ginger Lemongrass Ale, Pumpkin Ale and a Holiday Spiced Ale. In my opinion, we keep getting better and better at brewing and I especially loved the Holiday Spiced Ale (pictured above). 
Next up: IPA 

MW is the Master Brewer, leaving my role as Sous-brew. He's the aficionado of brewing techniques and hops and all that. But I happily brew along with him, learning more each time. Since our kitchen is small we're limited to doing extract brews. Once we have more space we'd like to move on to a mini-mash. 

We order our beer kits from Austin Home Brew where they have tons of supplies and kits available. MW also got some supplies at City Beverage (which also has a great beer selection- that's where I finally found Dogfish Head's 90 Minute Ale). You can even find kits that are similar to your favorite type of beer. This IPA we're brewing now is similar to Bell's Two Hearted Ale. Nice and hoppy!

Once you pick your kit and sanitize everything, you're ready to go:

First you steep the grains in about 3 gallons of water for flavor and color. 
The grains are determined by the type of beer you're making

Once they're nice and steeped...


Bring it to a boil and add the extract


The extract contains the fermentable sugars 
(which are normally from the grains in an all-grain kit or partly in a mini-mash kit)

Then, Gus comes to help. 


After the extract, add in some hops for bittering and bring it to a boil. 


Add more hops after about half an hour of boiling for flavor.
Then you add more hops after the boil for aroma. 


Then you cool it all to a temperature that the yeast can handle
Syphon the mix into a brew bucket with cool water to bring the total volume to about 5 gallons. 
Once it's all transferred, add the yeast (the brew should be about 70 degrees by this point)


This yeast has a "smack pack" inside that, once popped, activates the yeast prior to using it. 
When the bag is inflated, you know it's working and ready. 
As you add the yeast, vigorously stir the beer to aerate it to help the fermentation process begin quickly. 


Then, you cap it off and add an airlock (the clear thing) filled with water.

The airlock will create a seal and bubbles when the yeast is active. 
Yeast is what eats the sugars in the beer and produces alcohol and CO2. 
This lets you know that the beer is fermenting and allows the gas to escape.


After it's all done, we pack it away in the back of a dark closet to ferment happily for about a week, before we transfer it to a secondary fermenter to clear up the beer and we'll dry hop it then for aroma. And about a week after that, we get to keg it. 

I'm always excited to have a new brew on tap!

Tuesday, May 3, 2011

Summer Garden

Sunday we planted our garden (as I'm sure you guessed, or heard by now). Our summer garden is one of my favorite things about living with MW and having a little patio. I cannot WAIT until I have a yard that will be full of tasty veggies.

Little baby onions! 

We have so many herbs. I can't wait to cook with them. 


We even planted a box with "drink herbs" including mint, lemonbalm,
and this little stevia plant. 


The lemonbalm leaves smell wonderful


We're even attempting a little string bean plant this year


In addition to the numerous patio and cherry tomatoes, 
we have a free-standing plant with larger toms


and of course, a pretty flower for my porch time. 

I'm so excited to watch the garden grow. We've planted so much this year and really maximized our space, and we still have some stuff to plant when it arrives (spinach and lettuce!). 

Monday was my last day of class for the Spring Semester. Now I have two full weeks before my next class starts. I was able to get back to the gym for the first time in a while tonight and enjoyed a nice cycle light class with my favorite instructor. 

After the gym I decided to try out a new snack: Chickpea poppers! Or, at least, that's what I call them. 

To make:
I drained, rinsed, strained, and dried a can of chickpeas

Then I spread them on a pan and baked for about 30-40 min on 450 degrees. 
Every 10 mins or so, I shook the pan to make sure they didn't stick.
I sampled a few to see when they were good and crunchy and then took them out. 

If you spritz them with a little baking spray and toss them in some seasoning, it sticks quite well.
I used garlic salt on one half and garlic salt + cayenne pepper on the other.

They aren't overwhelmingly flavorful but I really enjoy them. Plus they're easy to munch on with the added bonus of being a good source of protein. Yum! I plan to make a batch as a gift to MW's mom for mother's day. I can't wait to try out some different flavors, too. 

Sunday, May 1, 2011

Quickie

We've had a super busy weekend! So this will be a super short update preceding a longer one soon. No, I haven't had time to go through those pictures as promised. However, my last day of class is Monday and MW has his last final Wednesday, so I think I will have some time in the evenings soon to get through them (I promise, Aunts!).
But check out my awesome Easter basket (thanks parents!!)


Saturday MW helped someone move so I took the liberty to deep clean the apartment. Yes, the same thing I claimed to do last weekend. But this weekend I actually did it. Scrubbed all the floors, detailed the bathrooms, de-germed the kitchen and vacuumed (which is not a small task when you have beige carpets + black cat + vacuum not meant for heavy duty tasks). But I managed.

Oh and here's the breakfast MW cooked me yesterday. It's okay to be jealous, that's normal. Frittata with orange and yellow peppers, tomato, spinach and onion PLUS mozzarella. Everything bagel with homemade garlic butter. Topped off with french press coffee out of my cute mug from Wisco. Yum!

Today we fueled up and prepared for what could possibly be the most exciting day of spring, for me.  I'll keep it a surprise until tomorrow, but here's a hint:


As I was waiting for MW, I made a quick batch of sugar free, plain yogurt.

MW got me a yogurt maker last May and I'm in love with it.  Plus we can make yogurt and know exactly what's in it (aka no added sugars). 

First you boil milk. We use organic 1% milk from NC that we buy from the Reynolda Farm Market. 
I have two tips so as not to burn your milk. 
1. Sprinkle the bottom of the pot with granulated sugar and melt it on low heat. 
2. Heat the milk on low heat and DON'T STOP STIRRING. 

Once it has boiled, stick it in an ice bath until it's about 115-117 degrees. 
Whisk in your yogurt starter (and I added a little vanilla too, yum!)

Then set it in your yogurt maker for a couple hours. 
The longer it sits, the firmer it gets. 

A yogurt maker just keeps the milk at a constant temperature so that the bacteria can thrive and make yogurt. I've read you can do this in an oven as well, but it seems that this is much more energy efficient. Is it wrong of me to want another? We savor every last jar of this yogurt. 

I'm excited to show you what the rest of the day held for us!